Tattooing is an art form that requires precision, skill, and the right tools.
While many tattoo artists use coil machines for their artwork, setting up these machines can be a complex process.
From adjusting springs to bending needles, every step is crucial for achieving the perfect tattoo.
In this guide, we will explore the ins and outs of setting up a coil tattoo machine, covering everything from the basics to advanced tuning techniques.
Whether you’re a seasoned artist looking to fine-tune your skills or a beginner eager to learn the ropes, this guide has something for everyone.
So, grab your machine and let’s dive into the world of coil tattoo machines.
Table of Contents
how to set up coil tattoo machine
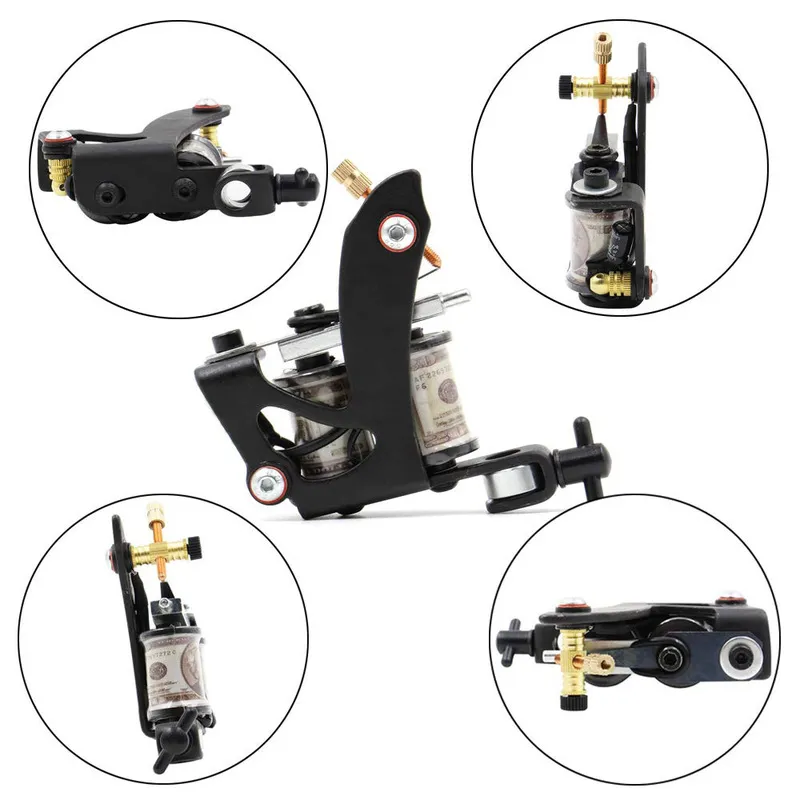
To set up a coil tattoo machine, you need to first set up the springs and put a slight bend in the tattoo needle.
Then, slide the needle carefully through the tube and adjust the tube to align the needle properly.
Make sure the needle goes all the way back into the tip to pick up ink.
Apply a rubber band around the machine for pressure, attach a clip cord to the back, and turn it on with a foot pedal or power button.
Use a voltage of 4 volts for shading and 5.5 volts for lining.
Adjust the CPS to 120 for shading and 130 for lining.
For a coil machine, adjust the duty by bending the back spring up or down.
For a rotary machine, attach the needle bar and cam wheel, adjust the depth of the needle, and plug in the RCA cord to power.
Set up a machine bag or use disposable grips.
Pen machines are simple to set up, with a set stroke of 3.5mm, and can be wireless or require an RCA cord.
Tuning the machine involves adjusting the springs, air gap, and sound.
Key Points:
- Set up the springs and bend the tattoo needle
- Carefully slide the needle through the tube and align it properly
- Ensure the needle is fully inserted into the tip to pick up ink
- Apply a rubber band for pressure and attach a clip cord to the back
- Use 4 volts for shading and 5.5 volts for lining
- Adjust the CPS to 120 for shading and 130 for lining
how to set up coil tattoo machine – Watch Video
💡
Pro Tips:
1. The coil tattoo machine, also known as the electromagnetic tattoo machine, was invented by Thomas Edison in 1876 as a way to simplify the process of tattooing.
2. The setup of a coil tattoo machine involves configuring the number of coils on the machine, typically ranging from 8 to 12, which directly affects the speed and power of the needle.
3. The most common arrangement of coils in a coil tattoo machine is known as the “liner” setup, which produces thinner lines and is commonly used for outlining designs.
4. Alternatively, the “shader” setup utilizes a different arrangement of coils, resulting in a softer and smoother shading effect, perfect for filling in large areas of a tattoo.
5. It is essential to properly adjust the needle depth when setting up a coil tattoo machine to ensure the tattoo ink is deposited at the correct level within the skin, preventing both shallow and overly deep tattoos.
Traits Of Successful Tattoo Artists
Successful tattoo artists possess five common traits that contribute to their success in the industry. These traits include:
- Creativity: It is essential for creating unique and visually appealing designs.
- Technical skills: They ensure that the artist can execute those designs with precision.
- Strong work ethic: It drives tattoo artists to continuously improve their craft and provide quality work for their clients.
- Good communication skills: They are necessary for understanding and translating clients’ ideas into tattoo designs.
- Professionalism: It is crucial for building a reputable and reliable tattoo business.
These five traits serve as a foundation for becoming a successful tattoo artist and should be taken into consideration when setting up a coil tattoo machine.
Challenges Of Tuning Coil Tattoo Machines
Coil tattoo machines are considered traditional and can be tricky to tune. Tuning a coil machine involves adjusting the components to achieve optimal performance and ensure a smooth and consistent tattooing experience. The main challenge with tuning coil machines is finding the right balance between the speed and power of the machine. Every tattoo artist has their own preferences and techniques, making the tuning process a highly individualized task.
Additionally, coil tattoo machines require regular maintenance and adjustment to maintain their performance. This can include replacing worn or damaged parts, cleaning the machine, and fine-tuning the springs and contact points. It is important to have a thorough understanding of the machine’s mechanics and how each adjustment affects its performance.
Despite the challenges, many tattoo artists still prefer using coil machines for their versatility and ability to produce precise and detailed work.
Separate Machines For Lining And Shading
Many tattoo artists use separate machines for lining and shading. This allows them to optimize each machine’s setup for the specific task at hand. Lining machines are typically set up with a shorter stroke length, producing quick and precise lines. On the other hand, shading machines often have a longer stroke length and are adjusted for a slower and softer application of ink.
Using separate machines for lining and shading allows tattoo artists to switch between techniques seamlessly and produce high-quality work. It also eliminates the need for constant adjustments and tuning of a single machine to accommodate both tasks.
When setting up separate machines for lining and shading, each machine should be fine-tuned to achieve the desired stroke length, speed, and power for its specific application.
- Separate machines for lining and shading
- Lining machines have a shorter stroke length for quick and precise lines
- Shading machines have a longer stroke length for slower and softer application of ink
- Seamless technique switching
- Eliminates constant adjustments and tuning
- Fine-tuning for desired stroke length, speed, and power.
Setting Up Springs For Coil Tattoo Machines
Setting up a coil tattoo machine requires careful adjustment of the springs, which play a crucial role in determining the machine’s performance. The front and back springs of a coil machine control the distance and speed at which the needle moves. By adjusting the tension and position of the springs, tattoo artists can customize the stroke length and speed of their machine.
When setting up the springs, tattoo artists should consider the desired stroke length for the specific task they will be performing. For lining, a shorter stroke length is preferred, while shading often requires a longer stroke length. The front and back springs should be adjusted accordingly to achieve the desired stroke length.
It is important to note that the adjustment of springs is a delicate process and may require trial and error to find the right balance. Patience and practice are key when setting up the springs for a coil tattoo machine.
Importance Of Bending Tattoo Needle
Putting a slight bend in the tattoo needle is necessary to ensure optimal performance and ink distribution. This bend allows the needle to penetrate the skin at the correct angle, resulting in crisp and clean lines. It also helps prevent the needle from snagging or causing unnecessary damage to the skin.
When setting up a coil tattoo machine, tattoo artists should carefully bend the needle to the desired angle, taking into consideration the specific technique they will be using. The bend should be subtle, ensuring that the needle enters the skin smoothly and consistently.
Properly bending the tattoo needle is essential for achieving high-quality tattoo work and minimizing discomfort for the client. It is important to take the time to master this technique when setting up a coil tattoo machine.
Careful Needle Sliding Through The Tube
- Sliding the needle through the tube carefully is crucial in setting up a coil tattoo machine.
- The needle should slide through the tube smoothly and without resistance to ensure optimal performance and tattoo quality.
- Any resistance or needle jam can negatively impact the machine’s performance and the final result.
- Tattoo artists should regularly clean the tube and check for any debris or obstructions that may hinder the needle’s movement.
- Replacing the tube when necessary is important for maintaining optimal performance.
- Using lubrication can enhance the needle’s movement, making it smoother and effortless.
- Handle the needle with care to avoid bending or damaging it while sliding it through the tube.
- Proper handling and delicate movement are essential for a successful setup of a coil tattoo machine.
Crucial Alignment Of Needle And Tube
Aligning the needle properly within the tube is crucial for achieving precise and accurate tattooing. When the needle is misaligned, it can cause inconsistent lines, blurring, or even damage to the skin. Ensuring proper alignment ensures that the ink is deposited evenly and the tattoo turns out as intended.
When setting up a coil tattoo machine, tattoo artists should pay close attention to the alignment of the needle and tube. The needle should be centered within the tube and move freely without touching the sides. If there is any misalignment, adjustments can be made to the tube or needle to correct it.
Proper alignment of the needle and tube is an essential step in the setup process and should not be overlooked. The attention to detail in this stage will significantly impact the quality of the tattoo.
- Align the needle properly within the tube.
- Center the needle within the tube.
- Ensure the needle moves freely without touching the sides.
“Proper alignment of the needle and tube is crucial for achieving precise and accurate tattooing.”
Ensuring Proper Ink Pickup During Tattooing
Proper ink pickup is crucial for achieving a high-quality tattoo. If the needle does not go all the way back into the tip while tattooing, it won’t pick up enough ink, resulting in patchy or faded lines. Ensuring that the needle goes all the way back is essential for a consistent flow of ink and vibrant colors.
When setting up a coil tattoo machine, tattoo artists should pay attention to the distance between the needle and the tip. The needle should extend beyond the tip slightly to ensure that it goes all the way back when tattooing. Adjustments can be made to the needle depth or the grip to achieve the proper ink pickup.
Taking the time to ensure proper ink pickup during the setup process will help prevent any issues while tattooing and result in a more successful tattooing experience.
Pressure Application For Better Line Work
Applying the right amount of pressure while tattooing is essential for achieving clean and consistent lines. To improve line work, tattoo artists often apply pressure by using a rubber band around the machine. This rubber band provides slight pressure, helping prevent bouncing and ensuring a smooth and controlled motion.
When setting up a coil tattoo machine, tattoo artists should attach a rubber band around the machine’s frame, preferably near the front coil. The placement and tension of the rubber band can be adjusted according to the artist’s preferences and the specific tattooing technique. Experimentation may be necessary to find the ideal pressure for individual comfort and desired line quality.
The application of pressure through a rubber band is a simple yet effective technique to enhance line work when using a coil tattoo machine.
Necessary Steps For Powering Coil Tattoo Machines
Powering a coil tattoo machine involves several necessary steps before tattooing can begin. These steps include attaching a clip cord, powering the machine with a foot pedal or power button, and adjusting the voltage and cycles per second (CPS) settings.
When setting up a coil tattoo machine, tattoo artists should first attach a clip cord to the back of the machine. This clip cord connects the machine to the power supply, allowing for a consistent and reliable power source.
Next, the machine can be powered on using either a foot pedal or a power button, depending on the artist’s preference. The foot pedal provides hands-free control of the machine, while a power button requires manual activation.
Once the machine is powered on, tattoo artists should adjust the voltage and CPS settings to achieve the desired performance. For lining, a voltage of 5.5 volts and a CPS of 130 are recommended, while shading requires a lower voltage of around 4 volts and a CPS of 120.
Properly powering a coil tattoo machine is essential to ensure optimal performance and tattoo quality. Taking the time to set up the machine correctly will enhance the tattooing experience for both the artist and the client.
💡
You may need to know these questions about how to set up coil tattoo machine
What voltage is needed for shading coil tattoo machine?
Achieving optimal shading in a tattoo machine requires a voltage of approximately 8 volts. By utilizing a 3mm stroke and lower voltage, you can effectively enhance the realism of the tattoo and ensure a consistent and smooth shading technique. Lowering the machine’s speed is crucial in attaining precise and flawless shading, resulting in a remarkable tattoo artistry.
How do you adjust the stroke on a coil tattoo machine?
To adjust the stroke on a coil tattoo machine, you can manipulate the stroke length by tweaking the contact screw. By turning the contact screw, you can either increase or decrease the gap through which the armature bar moves. This alteration in the gap ultimately transforms the stroke length of the machine, allowing artists to fine-tune their tattoos and create precise and desired results.
What voltage is needed for tattoo lining?
When it comes to tattoo lining, the required voltage typically falls between the range of 9 to 11 volts. This range is commonly used for pen machines, providing the optimum power needed for precise and clean lines. However, it is essential for tattoo artists to adjust the voltage based on their specific technique, client’s skin type, and the tattoo design’s complexity. Finding the right voltage plays a crucial role in achieving the desired outcome and ensuring a smooth tattooing experience for both the artist and the client.
What voltage should a tattoo gun be set at?
The optimal voltage to set a tattoo gun at depends on the specific stage of the tattooing process. Generally, when designing on the skin, it is recommended to set the voltage between 7.5 to 8.5 volts. However, if you are in the initial lining stage of the tattoo, it may be suitable to increase the voltage to around nine volts. It is crucial to adjust the voltage according to the specific needs and progress of the tattoo.
Reference source
https://www.youtube.com/watch?v=MFiOv6vtfKc
https://tattooing101.com/learn/tattoo-equipment/machine-setup/
https://www.youtube.com/watch?v=0yBystDSvnw
https://tattooing101.com/learn/tips-advice/what-voltage-should-you-tattoo-with/#:~:text=For%20a%20realistic%20tattoo%20or,make%20sure%20everything%20is%20consistent.